 By Graham Fisher
Updated November 2026
A free baby proofing kit 2019 offer usually bundles basic hardware like outlet covers, cabinet latches and corner guards, and it can give you a solid starting point for a toddler home. This guide explains what those kits typically contain, how to check whether a giveaway is legitimate, and how to turn the supplies into a finished safety plan. Think of the kit as a head start, not a complete solution.
What a Free Baby Proofing Kit Usually Includes
Most free kits, whether sponsored by a retailer, a hospital program or a local safety group, focus on the same low-cost essentials. Before you sign up, compare the contents against the hazards in your home, because a kit rarely covers everything a toddler can reach.
Shopping for one? See our guide: 10 Best Central Vacuum Baby Proofing Kits for Homes with Toddlers.
- Outlet covers or sliding plug covers for unused wall receptacles
- Cabinet and drawer latches, usually a few adhesive or screw-in types
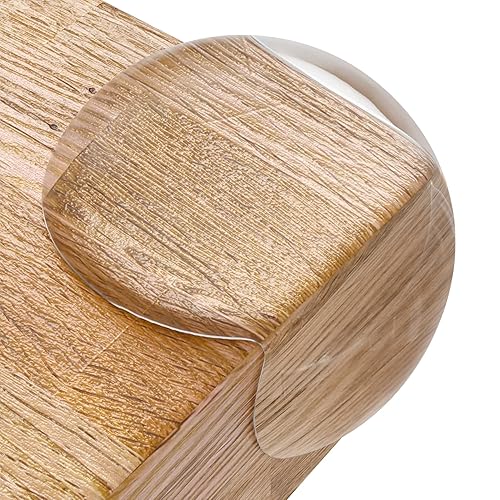
- Corner and edge guards for coffee tables and fireplace hearths
- A door stop or finger pinch guard
- Sometimes a basic safety handbook or checklist
Missing from most kits: stair gates, furniture anchors, window stops and water-heater or medicine-lock supplies. Plan to buy those separately.
How to Verify and Claim a Kit Safely
Free offers attract scams, so take a few minutes to confirm the source before you share an address or payment details. A legitimate kit should never require a credit card for shipping.
- Check that the sponsor is a known hospital, retailer, insurer or local government program.
- Read the offer’s terms. Look for hidden subscriptions or required purchases.
- Use a dedicated email address if the form asks for more contact details than you need.
- Note the expiration date. Many 2019-era promotions have closed, so any page still advertising one should be checked carefully.
If you are unsure, call the sponsoring organization directly using a number from its official website rather than one printed in the offer.
Turning a Kit Into a Full Safety Plan
Once the kit arrives, install the pieces in order of risk rather than in the order they appear in the box. Start where a toddler spends the most time and has the most access to hazards.
Step 1: Walk the Floor at Toddler Height
Crouch to about 24 inches off the floor and look for outlets, cords, sharp corners and cabinets within reach. Mark each hazard with painter’s tape.
Step 2: Secure Electrical Hazards First
Fit outlet covers in every unused receptacle. Where a cord must run along a wall, use cord shorteners or cord covers so it cannot be pulled down.
Step 3: Latch Cabinets With Chemicals and Sharps
Install latches on cabinets holding cleaners, medicines and knives. Test each one by pulling firmly before you trust it.
Step 4: Soften and Stabilize
Apply corner guards to hard edges and check that heavy furniture and TVs are anchored to the wall. Anchors are not included in most kits, so budget for them separately.
Common Mistakes to Avoid
- Assuming the kit covers the whole house. It usually addresses only a few hazards.
- Using adhesive latches on painted surfaces that peel, which can leave residue or fail.
- Leaving outlet covers loose in a drawer instead of installing them.
- Forgetting to re-check the installation every few months, since toddlers test everything.
- Skipping the fit test. A latch that a child can open is not doing its job.
Recommended Gear
Several items fill gaps that most free kits leave open. Pick based on what your home actually lacks.
- Stair gates: a pressure-mounted or hardware-mounted gate is the usual choice at the top of stairs. View on Amazon
- Furniture anchors: straps or brackets keep dressers and bookcases from tipping. View on Amazon
- Magnetic cabinet locks: useful where adhesive latches will not hold. View on Amazon
FAQ
Is a free baby proofing kit really free?
Often the kit itself is free, but some offers require you to pay shipping or to complete a purchase. Read the terms before you accept.
Do free kits meet current safety standards?
Most reputable kits use products that meet basic consumer safety requirements, but you should inspect each item for small parts and loose fittings. Consult a pediatric safety professional if you have concerns.
How far in advance should I install these items?
Install them before your child starts crawling or pulling up, since hazards are easiest to address before a child can reach them.
Conclusion
A free baby proofing kit can cover the basics of outlets, cabinets and sharp corners at little or no cost. Verify the offer, install the pieces in order of risk, and then fill the gaps with stair gates and furniture anchors. Re-check the whole house as your child grows.
Related reading
- Plastic Free Baby Proofing: A Step-by-Step Guide for Toddler Homes
- Baby Proofing Kit Argos: A Step-by-Step Guide to Choosing and Using One
- Adhesive Free Baby Proofing: A Step-by-Step Guide for Renters (2026)
- 4 Best Safety Baby Proofing Kit Options for Toddler Homes (2026)
Ready to choose one?
About Graham Fisher
Graham Fisher is part of our editorial team and reviews and edits our childproofing guides, checking product details against manufacturer specifications and owner feedback.