 By Graham Fisher
Updated November 2026
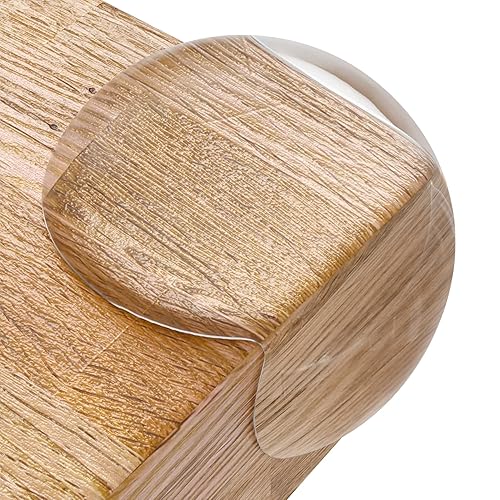
DIY baby proofing sharp corners means covering or softening the hard edges of coffee tables, dressers, fireplace hearths and built-ins so a toddler who falls or bumps into them is less likely to get hurt. With a few inexpensive materials and about an hour of work per room, you can protect the most common impact points in your home. This guide walks through how to find the risky corners, choose the right protection, and install it so it stays put.
Why Sharp Corners Matter for Toddlers
Toddlers are close to the ground, unsteady on their feet and often moving fast. Their heads sit at about the height of many table edges, which is why forehead and eyebrow cuts are among the most common injuries from furniture. A corner that looks harmless to an adult can cause a deep laceration or a head injury when a child runs, tumbles or climbs. Soft corner covers do not replace supervision, but they reduce the severity of the bump when it happens.
Shopping for one? See our guide: Corner Protectors Baby Proofing Review: Pros and Cons.
Step 1: Walk Through Your Home at Toddler Height
Start by getting down to your child’s eye level. Crouch, crawl, or sit on the floor and look at what a child sees. Most parents miss the corners they never notice from standing height, such as the lower edge of a bookshelf or the front corner of a low ottoman.
Make a simple list as you go. Note the room, the object, the type of corner (square, pointed, glass, or metal), and how often your child passes it. Focus first on high-traffic routes between the couch, kitchen, and bedroom, and on any furniture your child climbs or leans on.
Corners to Check First
- Coffee tables and end tables, especially glass-topped or with hard, square edges
- Fireplace hearths, stone or brick ledges, and raised tile surrounds
- Dressers, nightstands and bookcases with exposed front corners
- Kitchen islands, breakfast bars, and counter corners at child height
- Radiator covers, wall-mounted shelves, and window sills
- Stair newel posts and the ends of handrails
Step 2: Gather the Right Supplies
Most DIY corner protection uses a handful of basic materials. Having everything ready before you start prevents half-finished jobs and cuts down on trips to the store.
- Closed-cell foam strip or pipe insulation, sized to the edge
- Strong double-sided mounting tape or heavy-duty adhesive
- Clear packing tape for reinforcing seams
- Tape measure and a utility knife with fresh blades
- Rubbing alcohol and a lint-free cloth for cleaning surfaces
- Fabric or cardboard for wrapping the edge, if you prefer a custom cover
Step 3: Clean and Dry the Surface
Adhesive fails on dust, oil, and furniture polish. Wipe each surface with rubbing alcohol and let it dry completely, which usually takes a few minutes. Painted wood, laminate, and glass all bond differently, so test a small hidden spot first if you are unsure. Avoid applying tape to unfinished wood or fabric-covered furniture unless the manufacturer says it is safe, because the adhesive can stain or pull up the finish.
Step 4: Choose the Right Protection for Each Corner
Not every corner needs the same treatment. The best option depends on the shape of the edge, how often it is touched, and whether it will need to be removed later.
| Corner type | Best DIY option | Notes | |
|---|---|---|---|
| Square table corner | Adhesive foam corner guard, or foam tube with tape | Measure both sides of the corner so it covers the full edge | |
| Rounded edge | Strip of foam or split pipe insulation | Press firmly along the curve and reinforce the ends | |
| Glass tabletop | Clear or tinted corner guard designed for glass | Confirm the adhesive is rated for glass; check it often | |
| Fireplace hearth | Wide foam or padded hearth cover, secured with tape | Keep materials away from heat sources and open flames | |
| Metal or radiator edge | Foam tube sized to the radiator cover | Do not cover any heat-producing surface with foam |
Manufacturers of foam corner guards generally specify a temperature range for their adhesive. Read the label before installing near a stove, radiator or heater, and check with the manufacturer or a qualified installer if you are unsure whether a material is heat-safe.
Step 5: Install the Protection Carefully
Measure and Cut
Measure the length of each edge and add about half an inch so the foam can wrap slightly onto both faces. Cut with a sharp utility knife on a flat surface, pressing straight down rather than sawing, which tears foam and leaves ragged edges.
Apply the Adhesive
Peel the backing slowly and align the guard before it touches the surface, because most adhesives grab on first contact. Press along the full length with the heel of your hand, working from the center outward to push out air pockets. For curved edges, hold the foam in place for 30 seconds or so at each section.
Reinforce the Ends and Seams
Corner ends are the most likely to peel. Add a small strip of clear packing tape over each end, or dab a little extra mounting tape underneath. Check that no seam gaps wider than a few millimeters remain, since small gaps can give a child something to pull at.
Wait Before Heavy Use
Many adhesives reach full strength over 24 hours. Avoid pulling or stressing the guard during that time, and keep furniture from being pushed hard against it until the bond sets.
Step 6: Check and Maintain Every Week
Corner protection loses grip over time, especially in humid kitchens and bathrooms or on surfaces that get cleaned often with strong products. Run your hand along each guard once a week. Replace any section that lifts, cracks or shows torn foam. Foam that has been chewed, cracked or crumbled should come off right away, because small pieces are a choking hazard.
Common Mistakes to Avoid
- Skipping the cleaning step. Dust and polish are the top reasons adhesive fails.
- Covering only part of the corner. A guard that stops short of the bend leaves an exposed point.
- Using foam near heat sources. Heat can soften adhesive and foam, so keep materials away from heaters and radiators unless the product is rated for it.
- Forgetting the ends. Edges peel first at the ends, so reinforce them every time.
- Leaving loose pieces. Any peeled or chewed bit should be removed promptly.
- Assuming one fix covers everything. Glass, wood, and metal each need suitable adhesives.
Tips for Making Corner Protection Last
- Work from the floor up, so you can see exactly what your child sees.
- Keep a small roll of tape and a utility knife in a drawer for quick repairs.
- Pair corner guards with anchoring tall furniture, which addresses a more serious tip-over hazard.
- Take a few photos of each room after installation to compare during weekly checks.
- Reassess as your child grows. A toddler who climbs needs different protection than a child who is just learning to walk.
For a wider view of your home, see Safety Proofing Home for Baby Checklist: 12 Room-by-Room Steps, which covers the rest of the house, or Full House Baby Proofing: A Room-by-Room Step-by-Step Guide (2026) for a complete plan.
Recommended gear
These items are commonly used for this kind of project. Check each product’s label and specifications before buying to confirm it suits your surface and location.
- Foam corner guards. Adhesive foam guards are the most common choice for square table corners and are easy to cut to length. View on Amazon
- Foam pipe insulation. Split foam tubing works well on rounded edges and can be taped in place for a secure fit. View on Amazon
- Clear corner guards for glass. Clear or tinted guards made for glass tabletops blend in better than standard foam. View on Amazon
FAQ
Is DIY corner protection as safe as store-bought guards?
It can be, if the materials are appropriate for the surface and installed properly. Store-bought guards are often designed for specific furniture types, so compare the product details with your own corners before deciding.
What is the best material for covering sharp corners at home?
Closed-cell foam is the most common choice because it is soft, easy to cut, and holds an adhesive well. Choose a product that is labeled for household use and is free of small parts that could break off.
How do I remove corner guards without damaging the furniture?
Warm the adhesive gently with a hair dryer on low heat, then peel slowly at a low angle. Remove any leftover residue with a small amount of rubbing alcohol on a soft cloth, testing first on a hidden area.
Should I cover a fireplace hearth with foam?
Only with materials specifically rated for heat exposure and at a safe distance from the fire. Many parents use padded hearth covers designed for the purpose. Consult the manufacturer or a qualified installer if you are unsure.
How often should I check corner guards?
A weekly check is a good routine, plus a quick look after heavy cleaning or humid weather. Replace anything that is loose, cracked or torn.
When should I stop using corner protection?
Most families keep it in place until the child is out of the stage of falling and bumping into furniture, which varies widely. Reassess as your child becomes more mobile and more coordinated.
Do corner guards replace other baby proofing steps?
No. They reduce the impact of a bump but do not prevent falls, tip-overs or access to hazards. Pair them with other measures such as anchoring furniture and securing cabinets.
Can I use tape alone instead of foam?
Tape alone does not provide enough cushioning to reduce the force of an impact. Use it to reinforce foam or secure a guard, not as the main protection.
Conclusion
DIY baby proofing sharp corners is a manageable weekend project that protects your toddler from some of the most common household injuries. Start by checking every room at child height, choose a material suited to each surface, and install it with clean surfaces and reinforced ends. Inspect the guards every week, and if you have specific concerns about heat sources or a particular piece of furniture, consult the manufacturer or a qualified professional.
Related reading
- End Table Baby Proofing: 6 Steps to Secure Sharp Corners and Tip-Overs
- Foam for Baby Proofing: A Step-by-Step Guide to Safer Corners and Edges
- Baby Proofing Table Corners: A Step-by-Step Guide for Toddler Homes
- Baby Proofing Round Table: Corner Guards and Edge Safety Steps (2026)
Ready to choose one?
About Graham Fisher
Graham Fisher is part of our editorial team and reviews and edits our childproofing guides, checking product details against manufacturer specifications and owner feedback.