 By Graham Fisher
Updated November 2026
Padding for baby proofing means covering sharp corners, hard edges and hard floors with soft material so a toddler who falls or bumps into furniture is less likely to get hurt. In this guide you will learn which pieces of furniture need padding, how to measure and install it, and how to check that it stays put. Done well, the whole process takes an afternoon for most rooms.
Find the Spots That Need Padding
Start by crouching to your child’s eye level, which is roughly 2 to 3 feet off the floor for a walking toddler. Look for anything at head height or at the height of a fall: coffee table edges, fireplace hearths, TV stands, bathroom vanities and the corners of entry tables. Note each piece on a quick list so you can work room by room.
Shopping for one? See our guide: Baby Proofing Service Houston: 7 Best Options Compared (2026).
Choose the Right Padding Material
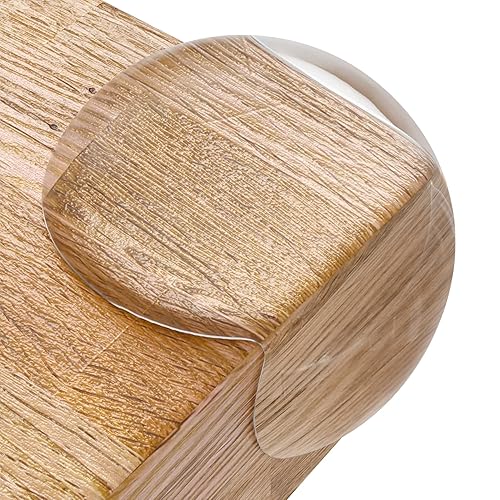
Corner guards are the most common choice, and they usually come as soft foam or rubber strips with adhesive backing or pre-drilled holes for screws. For wide, flat surfaces such as a hearth or a low ledge, edge strips or padded wraps work better than small corner caps. Look for material that is thick enough to absorb an impact and firm enough that a toddler cannot pull it off in one tug.
Install Padding Step by Step
- Wipe the surface with rubbing alcohol and let it dry completely. Dust and oils are the main reason adhesive fails.
- Test-fit each piece and mark its position with painter’s tape.
- Press adhesive pads on for the time the manufacturer specifies, usually at least 24 hours before heavy handling.
- For screw-mount guards, drill pilot holes first, especially in hardwood or particleboard, to avoid splitting.
- Press firmly along every edge and recheck the corners after a day.
Check Adhesive Ahead of Time
Some adhesives will leave residue or strip paint when removed. Test a small hidden area first, particularly on painted or lacquered finishes. If you are unsure about a surface, consult the furniture maker’s care guidance or a professional before applying anything.
Padding Floors and Hard Surfaces
Floor padding is less common but useful near a play area, under a hard stool or at the base of a stair landing. Interlocking foam tiles are the usual option, and they should be placed on a flat, stable surface with no gaps wide enough for small fingers. Choose tiles that snap or lock together so they do not slide apart during play.
Common Mistakes to Avoid
- Applying adhesive to dusty or greasy surfaces, which causes pieces to peel within days.
- Using padding that is too thin to absorb much impact.
- Leaving loose pieces or torn edges that a toddler could chew or pull free.
- Padding corners but ignoring sharp table legs and low shelving.
- Forgetting to recheck padding after the first few weeks, when adhesive can loosen with heat and use.
Recommended Gear
- Foam corner guards are a simple way to cover table and dresser corners without tools, and most come in neutral colors that blend into furniture. View on Amazon
- Interlocking foam floor tiles give a cushioned play area and cover hard floor edges in one step. View on Amazon
- Adhesive-backed edge strips work well for long, flat edges such as ledges and hearth surrounds. View on Amazon
FAQ
Does padding replace other childproofing measures?
No. Padding reduces injury from falls and bumps, but it does not stop a child from climbing or reaching hazards. Pair it with anchors, gates and locks where needed.
How often should I check padding?
Check it weekly for the first month, then monthly. Replace any piece that is cracked, torn or no longer firmly attached.
Can I use padding on a fireplace?
Yes, but only with materials rated for heat exposure. Read the manufacturer’s temperature limits and consult a professional if your hearth is close to a heat source.
Conclusion
Padding for baby proofing works best when you target the corners, edges and surfaces your toddler actually reaches. Measure carefully, prepare each surface and recheck the installation regularly. For a fuller plan, see Safety Proofing Home for Baby Checklist: 12 Room-by-Room Steps.
Related reading
- Baby Proofing Fireplace Padding: A Step-by-Step Guide for Safer Hearths
- Young House Love Baby Proofing: A Room-by-Room Guide for Toddler Homes
- Where to Buy Furniture Anchors: 5 Best Picks for Baby Proofing (2026)
- Where to Buy Baby Proofing Supplies: Stores, Tips and What to Look For (2026)
Ready to choose one?
About Graham Fisher
Graham Fisher is part of our editorial team and reviews and edits our childproofing guides, checking product details against manufacturer specifications and owner feedback.