 By Graham Fisher
Updated November 2026
A baby proofing kit from Argos can cover most of the hazards in a toddler home in one purchase, but only if you know what the kit includes, what it leaves out, and how to install it correctly. This guide walks you through checking the contents of a baby proofing kit bought from Argos, matching it to your home, and fitting each piece so it actually protects your child. By the end, you will have a room-by-room plan and a checklist for finishing the job.
Why a Baby Proofing Kit Makes Sense as a Starting Point
Toddlers reach, climb, pull, and open things far sooner than most parents expect. A kit bundles the common items into one order: outlet covers, cabinet and drawer locks, corner guards, door stops, and sometimes a gate. That saves you from building a list from scratch and makes it less likely you will miss a category. It does not replace an inspection of your home, though. A kit is a baseline. Your furniture, your stairs, your windows, and your cleaning supplies will still need specific attention.
Shopping for one? See our guide: 10 Best Central Vacuum Baby Proofing Kits for Homes with Toddlers.
Step 1: Check What the Kit Actually Contains
Before you assume a kit covers a given hazard, count the pieces and compare them against your house. Kits vary in size and in the types of locks they include. Many buyers find that the quantity of cabinet locks is too small for a full kitchen, or that the kit has no anchors for heavy furniture. Read the listing carefully and note the following:
- The number of outlet covers and whether they are sliding or plug-in type
- The number of cabinet and drawer locks, and whether they are magnetic, adhesive, or strap style
- Whether corner guards and edge bumpers are included, and their material
- Whether a stair or doorway gate is included, and its dimensions
- Whether furniture anchors or wall straps are included
- Whether window stops, toilet locks, or appliance locks are included
Once you know the contents, make a quick note of what is missing. You will likely need a separate purchase for furniture anchors, a stove knob cover, or a window restrictor.
Step 2: Walk Each Room and List the Hazards
Do this with your toddler’s current abilities in mind, not your own. Get down to their eye level and look for reachable items. A simple room-by-room audit works well. Start with the kitchen, then bathroom, living room, bedroom, hallway and stairs, and any laundry or utility area. In each room, note:
- Every electrical outlet within reach, and any cords hanging down
- Cabinets and drawers that contain cleaning products, knives, medicines, or small objects
- Furniture that is tall, top-heavy, or has sharp corners at head height
- Doors that can pinch fingers, and doors that lead to stairs or unsafe rooms
- Windows and blind cords
- Heaters, fireplaces, and hot appliance surfaces
- The bathtub, toilet, and any standing water
Our full room-by-room approach is useful here, and you can cross-check your list against Safety Proofing Home for Baby Checklist: 12 Room-by-Room Steps to catch anything you missed.
Step 3: Match Kit Items to Each Hazard
Now compare your hazard list with the kit. Some matches will be obvious. Others need a closer look. The table below shows a typical mapping. Your exact kit may differ, so check the actual pieces you received.
| Hazard | Kit item that usually covers it | Gap to fill separately |
|---|---|---|
| Open wall outlets | Outlet covers or sliding plug covers | Outlets behind heavy furniture may need a different solution |
| Cabinets with cleaners | Magnetic or strap cabinet locks | Large or double-door cabinets may need extra locks |
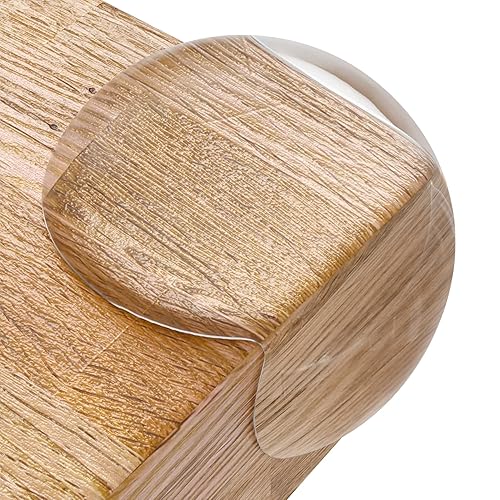
| Sharp table corners | Corner guards | Low-profile coffee tables may need edge bumpers |
| Tall dressers and bookcases | Often none | Furniture anchors or wall straps |
| Stairs and doorways | Pressure or hardware-mounted gate, if included | Top of stairs needs hardware mounting, not pressure |
| Toilet lid and bathtub | Toilet lock, if included | Bath faucet guard, non-slip mat |
Step 4: Install the Locks and Covers in the Right Order
Install in an order that keeps you from having to remove finished work. Start with the items that are hardest to reach later, then move to the easier ones.
- Install stair gates first, since they need the most precise measuring and are hardest to fit once other items are placed.
- Install furniture anchors next, while the furniture is still easy to move.
- Install outlet covers, checking that each one fits snugly and is not loose in the socket.
- Install cabinet and drawer locks. Test each one by pulling firmly. If a lock peels or slides, clean the surface with rubbing alcohol and let it dry before reapplying.
- Attach corner guards and edge bumpers, pressing firmly for the full adhesive time listed by the manufacturer.
- Set up window stops and blind cord safety devices.
- Test everything from your toddler’s height, not yours.
Measuring for a Stair Gate
Measure the opening at its narrowest point, usually at the top of the stairs or in a doorway. Note the width at floor level and at about 30 inches high, since walls are not always straight. Check the gate’s listed width range and confirm that the chosen gate sits within it. Pressure-mounted gates should never be used at the top of stairs, because a fall can push them loose. Hardware-mounted gates into the wall are the safer choice there.
Testing Anchors and Locks
Pull on each anchor and lock with real force, roughly the way a determined toddler would. Look for any movement, creaking, or peeling. Adhesive surfaces that look clean may still be dusty or greasy. Clean them before installing.
Step 5: Plan for the Kit to Change as Your Child Grows
A baby proofing kit is not a one-time job. Crawlers become climbers, and climbers become children who can open simple latches. Revisit the home every few months. Check that locks still hold, that gates still fit, and that new hazards have not appeared, such as a new piece of furniture or a sibling’s toys. Articles like Essential Baby Proofing Items: 12 Must-Haves for Every Toddler Home (2026) can help you spot what to add next.
Common Mistakes to Avoid
- Assuming the kit covers everything. Furniture tip-over is a major gap in many kits, and anchors should be bought separately if they are not included.
- Using pressure-mounted gates at the top of stairs.
- Installing adhesive products on dusty, greasy, or painted surfaces that are not fully cured.
- Leaving outlet covers loose. A cover that wiggles can be pulled out.
- Forgetting the bathroom. Water is a drowning risk even for toddlers who are not yet walking.
- Neglecting windows and blind cords, which carry strangulation risks.
- Testing from adult eye level instead of toddler height.
Tips for a Smoother Setup
- Do the whole house in one weekend if you can. Splitting the job over weeks makes it easy to forget a room.
- Keep a spare set of adhesive strips and a small screwdriver in one drawer for repairs.
- Take photos of each finished room so you can compare after a move or redecoration.
- Read the manufacturer’s instructions for each product. Weight limits and mounting rules vary.
- If you rent, check your lease before drilling. Many kit items use adhesive or tension-mount options that avoid damage.
Recommended gear
These items fill gaps that many baby proofing kits leave open.
- Furniture anchors: Wall straps that secure dressers and bookcases to the wall. They address tip-over, which kits often omit. View on Amazon
- Hardware-mounted stair gate: Required at the top of stairs, where a pressure-mounted gate is not safe. View on Amazon
- Corner and edge guards: Useful for low coffee tables and fireplace hearths that a kit’s standard corner guards may not fit. View on Amazon
- Stove knob covers: Keep little hands off burner controls, a gap in many general kits. View on Amazon
FAQ
Is a baby proofing kit from Argos enough on its own?
Usually not. Most kits cover outlets, cabinets, and corners, but they often leave out furniture anchors, window restrictors, and hardware-mounted gates. Use the kit as a base and fill in the gaps after a room-by-room check.
Can I install baby proofing items myself?
Most adhesive and pressure-mounted items are simple to fit. Hardware-mounted gates, furniture anchors, and window restrictors require drilling into walls and studs. If you are unsure about wall type or stud location, consult a qualified handyman or installer.
When should I start baby proofing?
Begin before your baby starts crawling, and expect to add items as mobility increases. Many parents find that the most important work happens around the time a child first pulls up on furniture.
How do I know if a lock is working?
Test it by pulling and twisting from your toddler’s height. A working lock should hold firm and resist simple pulling. If it slips, peels, or can be opened easily, replace or reinstall it.
Do outlet covers stop all electrical risks?
Outlet covers block casual contact with the openings, but they do not address damaged cords or overloaded sockets. Check cords regularly and consult an electrician if you notice warm outlets, flickering lights, or scorch marks.
Are adhesive locks safe to use long term?
Manufacturers specify weight limits and surface conditions for adhesive products. Check those limits, and replace any product that has lost grip. Owners often report that adhesives weaken in humid bathrooms and kitchens, so inspect those areas more often.
What is the most overlooked hazard in a home?
Furniture tip-over is frequently missed. Dressers, TV stands, and bookcases can topple when a child climbs them. Anchoring them to the wall is one of the most protective steps you can take.
Should I check my kit again after a year?
Yes. Adhesives age, gates loosen, and children change quickly. An annual review, or a review whenever you notice a new skill, keeps your setup current.
Conclusion
A baby proofing kit from Argos gives you a sensible starting point, but the real protection comes from matching the kit to your home. Check what is included, walk every room at toddler height, and fill the gaps the kit leaves. Install in a logical order, test every item, and revisit the setup as your child grows. Consult a professional for any hardware-mounted installation or wiring concern.
Related reading
Ready to choose one?
About Graham Fisher
Graham Fisher is part of our editorial team and reviews and edits our childproofing guides, checking product details against manufacturer specifications and owner feedback.